What is an Onboarding Flow? | 101 Guide for Beginners

Nidhi Kala
June 29, 2026
Table Of Contents

Onboarding flow is like getting blinds for the horse. You want them to see what you want them to see in order to win the race, and in this case, learn to use the tool.

But the single question that product managers and product teams come across is, how do I approach creating the first onboarding screen?

The answer? Here's a comprehensive guide we created to guide you on creating your first onboarding flow. A few things we cover in this article:

  • Steps to create onboarding flow
  • 3 onboarding flow examples to take inspiration from
  • 3 tips to make your onboarding flow stand out

What is an Onboarding Flow?

Onboarding flow is a multi-step process that showcases the product in action and teaches users how to use your product or service. It acclimatizes the user to the new software, its navigation, its UX, buttons, and CTAs in order to improve product stickiness. 

By providing an effective onboarding flow to users, you can:

  • Increase product adoption
  • Increase user activation
  • Increase customer retention
  • Reduce customer drop-offs

Ideally, the onboarding flow screen appears right after the first-time user signs up for the product. They get to see the information that guides the user on the product features and how they can use the platform. 

These instructions use onboarding elements like modals, tooltips, and product checklists, and progress bars to provide clear instructions about the product and make the in-app onboarding experience seamless.

Also Read: Customer Delight 101: All You Need To Know in 2026

What Onboarding Flow is Not?

User onboarding flow is not all about teaching the core functionality of your product. 

It's not about having a signup page on your website where you ask new users their first and last name, and business email address to get inside and start using the product. 

It's about showcasing the real value of your product for the active users to keep coming back to your product and providing the exact solution they came for: how will this product solve my problem and improve my life? 

When the users (and customers) see the value your product is delivering as soon as they start using it, they'll use your product often and recommend it too. 

Besides showcasing the product features, user onboarding flow is also about getting them used to your product’s UX design, and creating brand awareness.

How to Create an Onboarding Flow?

Creating an onboarding flow is not a tough nut to crack. Here's how you can create your first onboarding flow:

7-step process to create onboarding flow

Step 1: Understand Your Customer’s Goals

Why do your customers need your product? To understand your customer’s goals, you need to define the jobs to be done (JBTD). JBTD is the process of creating products based on your ideal customer’s specific needs, goals, jobs, and approach to purchasing the product. 

By using this approach, you step in your ICP’s shoes and understand the exact reasons they’d opt for when purchasing the product.  

Understand:

  • Who your customer is
  • What are the pain points they are currently experiencing
  • What things will make their job easier
  • What would stop them from using your product
  • What could be the reason for leaving your product 

But how will you find the answers to these questions and understand your customer's job to be done to create a customer-centric onboarding process?

  • Use in-product surveys: Get user feedback on the product through in-app messages. See how your product satisfies the user and the value your product is providing to them, what's missing, and how you can prove the product. 
  • Use Customer Data Platform (CDP): Collect customer data from multi-touchpoints and interactions. Compile this information and create your ideal customer profile.

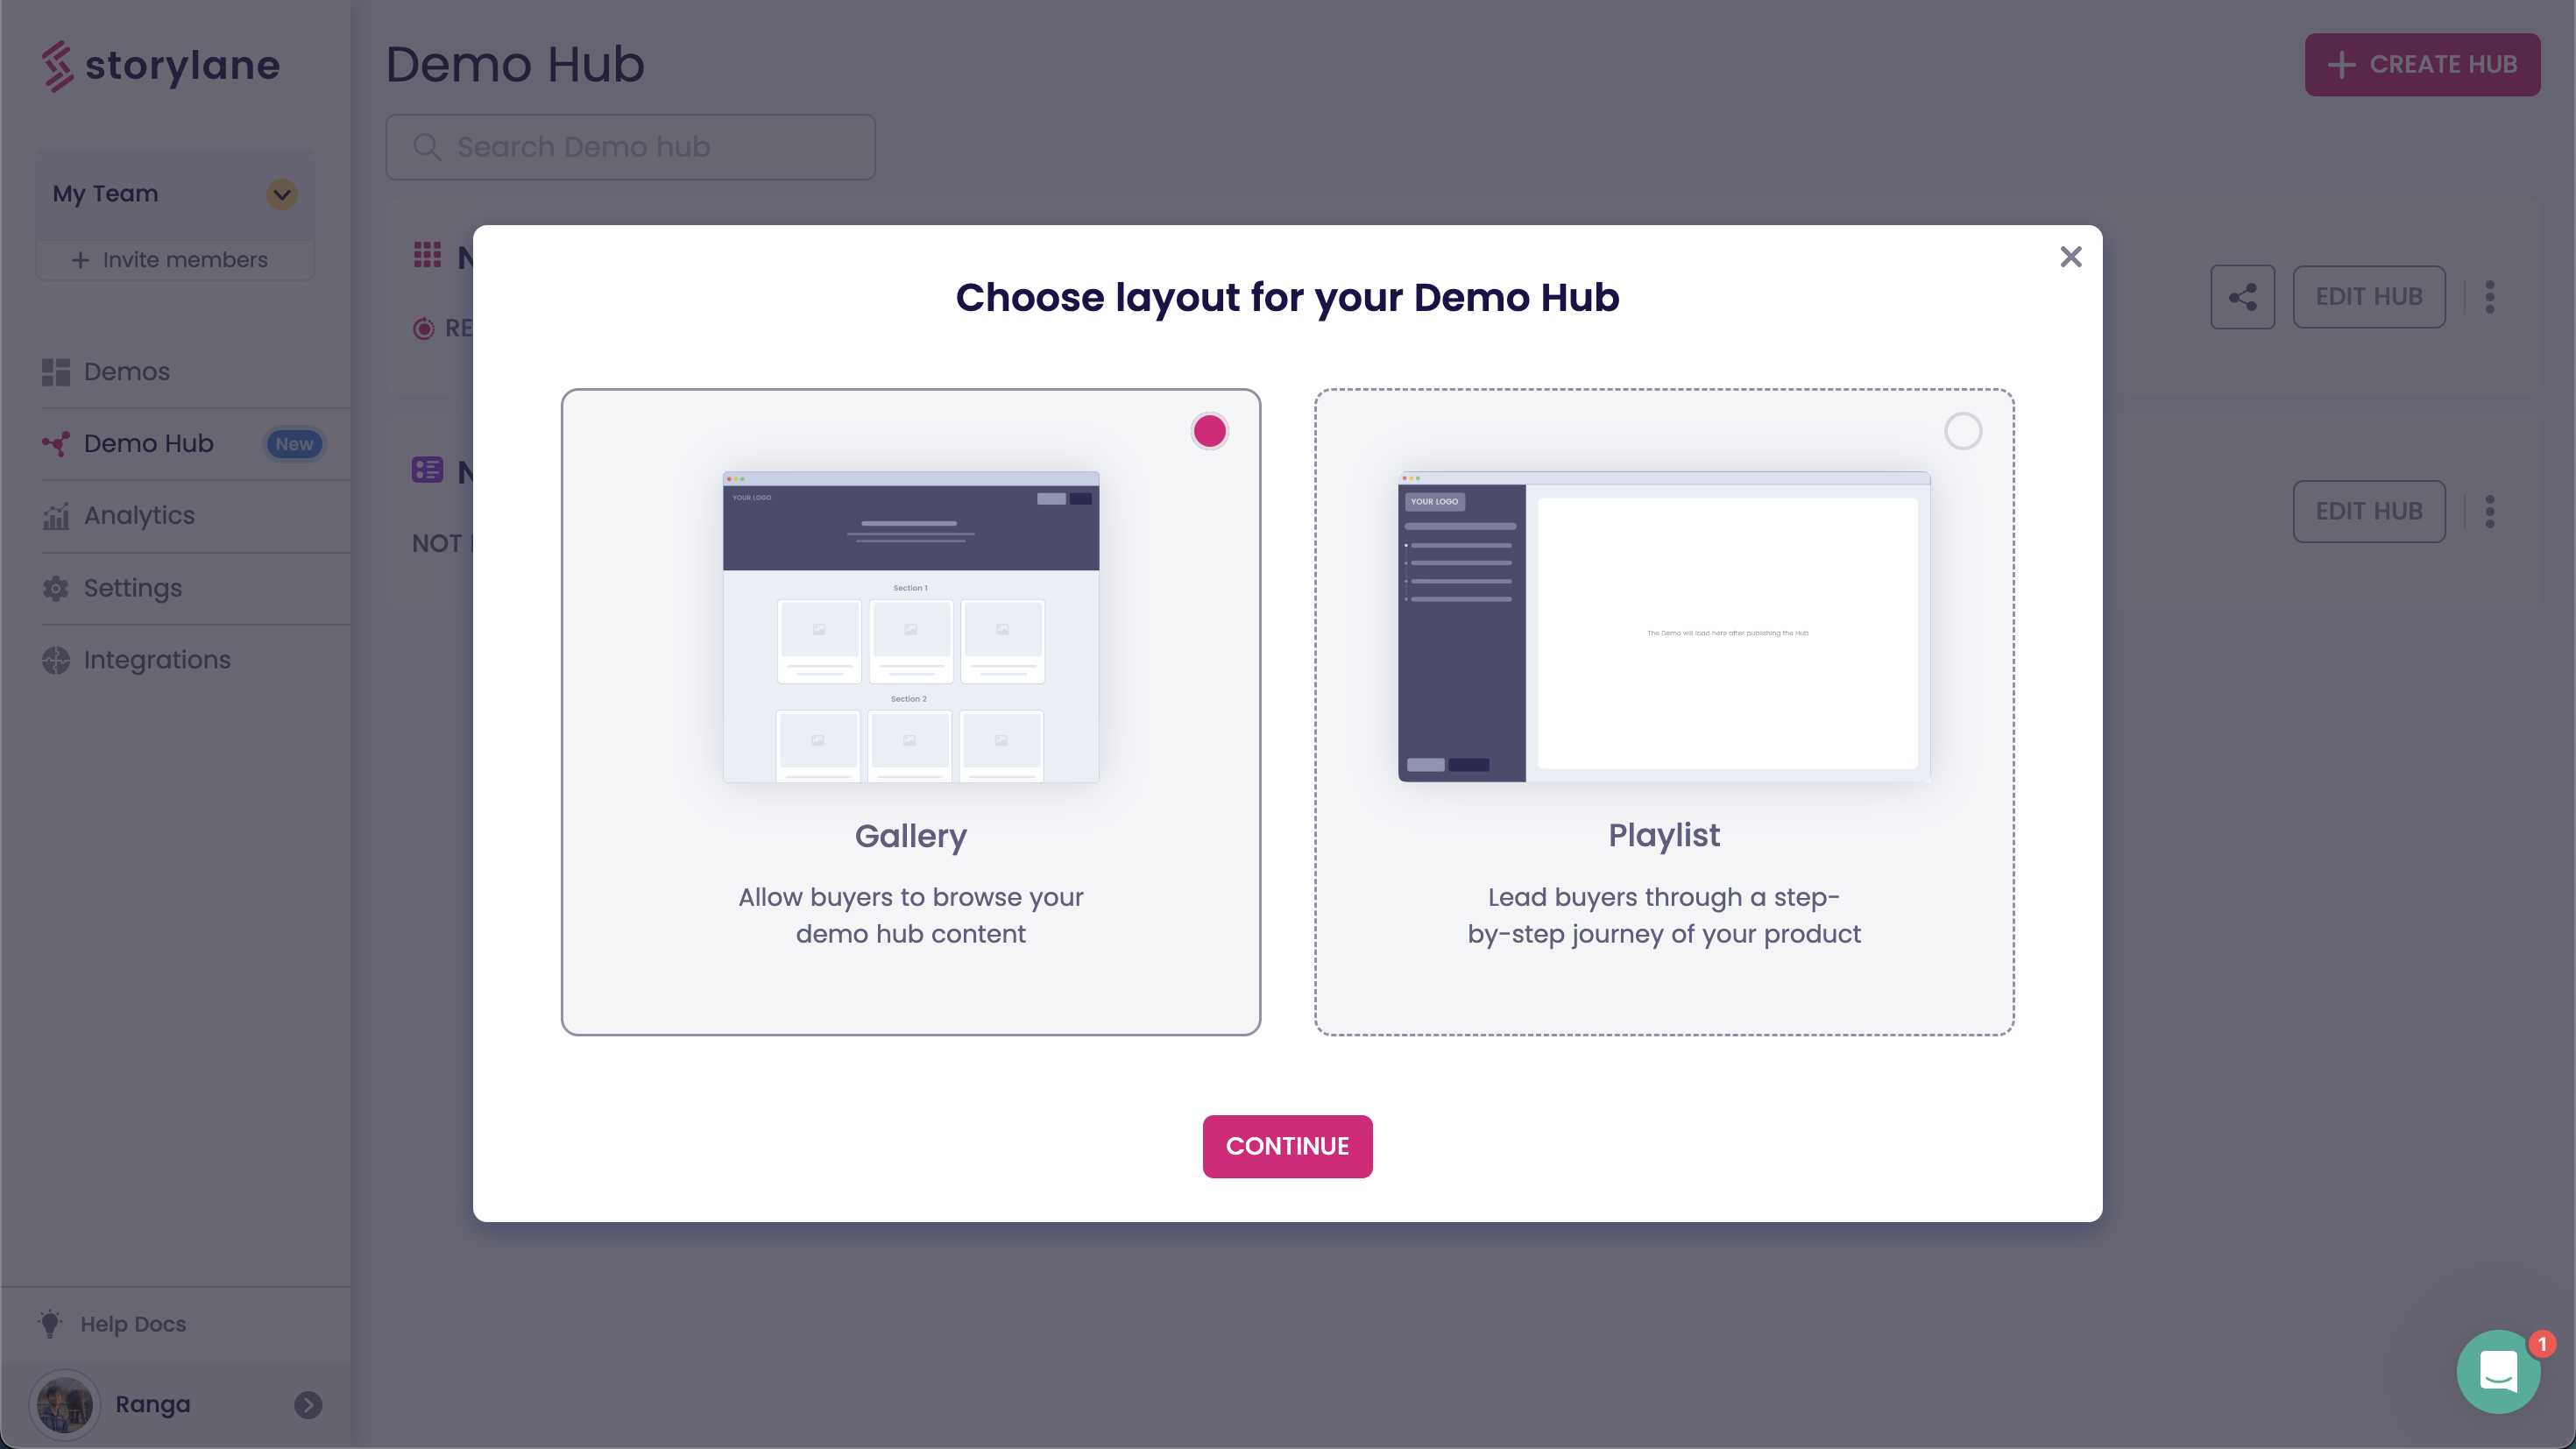
Step 2: Build Multiple Onboarding Flows and Segment Users

Instead of creating a single onboarding flow for every user, create multiple onboarding flows based on their ideal user persona. This helps you personalize the app experience for each user and leads to gradual engagement.

Here are a few examples of how you can personalize the onboarding flow for multiple users:

  • Create onboarding guides for different languages, dialects, and geographical locations
  • Create different how-to and why-to content for each flow

Next, segment the users into the right flows based on the ideal target persona. Based on the response to onboarding questions, find the commonalities and group users with the same response together. 

For example, if you’re a productivity SaaS software and you ask the user their goals for using the platform, you can group users with the same goals together.

Step 3: Offer Value Early

Showcase the core value proposition your product can offer the customers right at the beginning of the onboarding process. This helps you activate the users and reduces customer churn. 

To offer early value to customers and activate the users, here’s what you should do:

 Different ways to offer value early to users

Focus on core features and functionality relevant to target users

Leverage content assets like videos, knowledge base, product guides, etc. that guide the users about these functionalities in detail. 

For example, Sellular has created a library of product videos on different functionalities like sales automation, calling, sequences, etc. to showcase how the user can use the specific feature in their workflow.

Monitor user onboarding sessions 

This helps you understand how users are moving through their onboarding user journey, the blockages they face and what steps you can take to remove the friction and streamline their experience.

Send behavioral emails to motivate the users

Based on the user’s actions, you can send them emails related to a specific task with a CTA and link back to the task. 

For example, after a user signed up for Mailmodo, they received an email from the brand suggesting a few tasks they can do to understand more about the platform like sending emails, adding team members, and creating templates.

Mailmodo’s onboarding email guiding to use specific tasks

Step 4: Create an Intuitive User Sign-Up Experience

Most companies make it complicated for customers to sign up and start using the product. They’ll ask the customers for their name, email address, job profile, company name, industry they work in, number of employees — and whatnot. In fact, according to the State of SaaS Onboarding 2022 Report, 76% of users have a friction-based signup process. 

Here’s the thing: whether it is a first-time user or an unregistered user, each of them wants to start using your product quickly. They don’t like friction in the signup process and so, aim to remove the barriers. Simply, shorten your signup form and have only three form fields: name, email address, and company name. 

If you want to go a step further, you can provide the customers with a Google sign-in option. This reduces an extra step, and all they have to do is sign up with just one click.

Few quick tips to remove friction from your signup process:

  • Avoid asking the user to confirm their email address. Instead, do this step after they have interacted with your product.
  • Use Single Sign-On (SSO) to make signing up easier for new and first-time users.
  • Keep the number of additional questions short — a maximum of eight or ten questions, which can be divided into two screens.

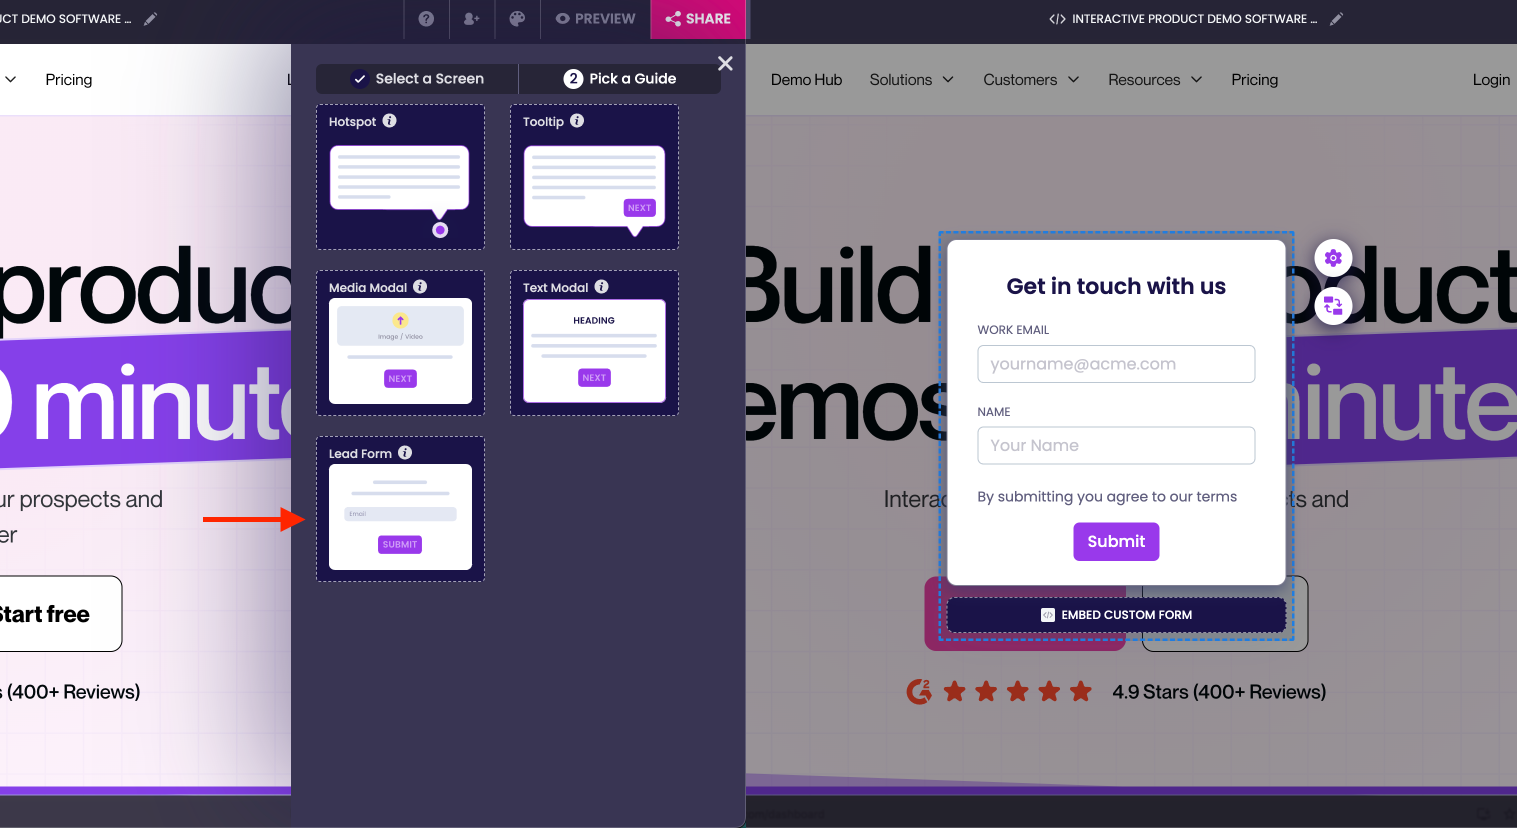
Step 5: Pick Your Onboarding Elements

User onboarding elements handhold the user through the entire onboarding process, address the customer’s specific needs, and streamline the user experience. 

Some examples of the onboarding process include: 

  • Onboarding emails: Welcome your users and guide them through the onboarding process. Tell them what the first step the user should take or where they should start exploring.
  • Video checklists: Create a checklist of super short feature videos that explain one feature or aspect of it quickly. This way, users can select what they want help with and navigate the tool without having to sit and watch the entire product tour. 
  • Guided product tours: Use guided tour software like Storylane to create step-by-step in-app guides that instruct the user about the specific product features of the product, their core benefit, and how you can use the particular feature.
  • Walkthrough videos: Create pre-recorded videos to showcase to the users how to navigate the product.
  • Knowledge base: Create a knowledge base or help center and answer every single question that your regular users have asked you in the past or questions that you feel the user may get stuck with while navigating a complex product. 
  • Live chat: Integrate live chat software to start interacting with the users and respond to their queries instantly.

Step 6: Personalize the Onboarding

When you have different customer personas using your product, providing the same onboarding experience to each customer would be a big mistake. 

So, create tailored experiences for different user segments. But how to do it? Here are a few ways for personalized and tailored experiences:

  • Personalize by name/ role
  • Create different tours for different stakeholders of the buyer journey. After segmenting the users, personalize which tours are shown to which prospects within your customer base depending on the segmentation

Step 7: Engage in Continuous Discovery

Once the onboarding process is completed, is your job done? No, it has just started. Double down on nurturing and engaging your users so that they can learn more about the product. This will help the product stay on top of the mind of the customer. And that’s a big goal, for them to continually believe in the tool and keep coming back to it. A few ways you can engage the user in a continuous journey and improve your customer experience include:

  • Use web analytics tools to track user engagement, activation, and retention rates. 
  • Find out NPS and CSAT scores to spot areas of improvement in your onboarding process and increase customer satisfaction.
  • Use exit surveys to understand why customers are downgrading. Use these granular insights to identify the blockers in your onboarding process and optimize it. 

3 Examples of Onboarding Flow

The 7-step onboarding flow process is great to learn from but isn’t it better to see it in action?  

Here are 3 user onboarding examples you can take inspiration from:

1. Mailmodo

Mailmodo, an email marketing platform directs the user to the signup page after they click on the ‘Try for free’ button on the website. Next, they are directed to the signup page where they have to fill in information — name, and business email address to get the user inside the product. 

After a  few onboarding questions the user gets to start using the product.

Here, two onboarding elements welcome the visitor: 

  1. CTA to schedule a demo
  2. Product checklist

For most of the key actions, Mailmodo has added three things to the product checklist: a video related to the task, a CTA to learn more, and a CTA that directs them to the specific task.

Also, once the user has signed up for Mailmodo they start receiving onboarding emails that guide the user to the specific task they can take and the product features they can use to maximize their workflow.

Why does this work?

  • They create an onboarding sequence and send a series of onboarding emails to the user that guide them on how they can use a specific feature and link back to the task so that they can start.
  • They add videos with each action on the product checklist to educate the user on how to achieve the specific user action.
  • It uses a progress indicator to track the progress of the user onboarding and how the users are engaging with the product.  
Onboarding elements on Mailmodo’s first screen after users answer the questions

2. Vidyard

Vidyard, a video messaging and asynchronous communication platform asks onboarding questions to understand the user’s goal by using their product.

Onboarding questions Vidyard asks its users

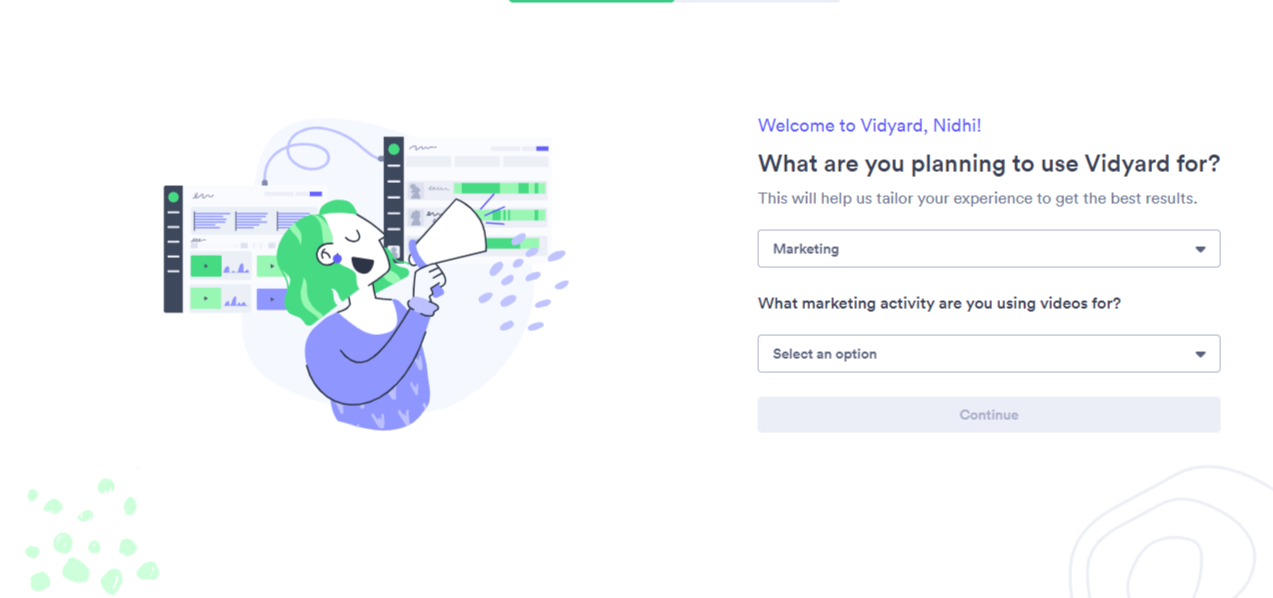
Once the user answers these two questions, the user is guided to another screen where they are guided to install Vidyard’s Chrome Extension. 

Next, the user will land on the main screen where they’ll see two meaningful actions: record the video and upload the video. On the left side, you’ll see the product checklist that tells the user the actions they have completed in the onboarding process and the remaining steps they need to complete. 

Under the product checklist they have provided two CTAs — ‘Learn more’ and user action to the product like ‘Record the video’, which drives the user to either learn more about the product or take action and complete the onboarding process. Plus, it includes a progress bar that determines the completion percentage of the onboarding process.

Vidyard featured a progress bar and product checklist as onboarding elements

Why does this onboarding flow work well?

  • Vidyard’s onboarding model quickly introduces their value to the user by encouraging them to install the Chrome extension, and uploading/ recording the video on the dashboard (when they enter inside the product screen).
  • It uses product checklists to showcase to the user the onboarding actions they have completed and the remaining actions so that the user knows the exact steps they need to complete the onboarding.
  • It uses a progress bar that indicates the percentage of product adoption and the success of the onboarding process

3. Ignition

Ignition, a client billing automation platform asks the user for their main objective for using the product and provides them with four options to choose from. 

Once the user chooses the relevant option, they’re directed to another screen where they ask for more information like their name, company name, phone number and country, and the source the user found about the platform. They are then directed to another onboarding screen where Ignition asks the users the additional details to understand the user better.

Onboarding questions asked to the user to personalize their onboarding experience

Once you’ve completed these steps, you’ll enter the platform. Here, the user will see a modal on this screen that introduces the user to the platform. To learn more about the platform, the user will click on ‘Get Started’.

The modal screen that appears after the user has answered all the onboarding questions

Next, they see three onboarding elements: video showcasing the product tour, product checklist, and guided product tour to achieve specific user actions.

Ignition’s main screen where it has added all the onboarding elements
Product checklist with a specific task using guided product tour

When the user clicks on a specific task from the product checklist like experience client billing, they can view a modal with a CTA to view the guided tour to understand how to set up the specific task. 

When the user takes the action to view the interactive demo, they enter into a new screen where the guided interactive demo starts and the user can learn everything about using the feature. 

Ignition’s onboarding screen giving more information about a specific feature

Guided product tour to educate the Ignition user about a specific feature

Why does this onboarding flow work?

  • The signup page includes intuitive elements that make the signup process quicker for the user i.e., signing up with invoicing software like Quickbooks.
  • It uses a combination of different onboarding elements: pre-recorded product tours, product checklists, in-app guide elements like modals, and guided product tours which makes learning about the platform and each specific feature seamless for the user. 

How to Make Your Onboarding Flow Stand Out?

Onboarding flows can be boring to someone with a unique pain point, which is usually the case. So, how can you encourage users to watch them? Make it stand out, and interesting. Here are few expert tips to help you refine the process and make onboarding flows more interactive:

Tip 1: Map your Onboarding Process Based on Multiple Personas

"Most of the products solve for multiple personas. As such, the value props and aha moments for each persona are almost always different. Hence, it's important to map your onboarding flows based on the persona and their expected goals to create a persona-based user onboarding experience."

How do you do that?

"In the fear of adding friction, most companies do not ask new users to define their primary use case but it isn't a hindrance, and most users would be happy to provide that information. So ask your users about their persona and then direct them through their relevant flows. This will ensure everyone achieves their primary objective rather than a universal objective." — Anand Vatsya, Product Marketer at Storylane

Tip 2: Answer User Objections

"Creating user onboarding flows that answer some of the objections new users might have is important.

For us, a client in the music streaming space needed to streamline their app onboarding flow to reduce the number of users bouncing off before finishing their account setup. 

We added the option for users to visit the app as a guest without giving their personal data only increased the sign-ups but also reduced the number of users who bounced off before finishing the signup process."

— Methuselah Marava, Digital Marketing Executive at upMention

Tip 3: Use a Combination of Product Walkthroughs and Guided Product Tours

When picking your onboarding elements, instead of focusing on one element, choose both: product walkthroughs and guided product tours

Doing this basically puts the ball in their court, in this case you are giving them the choice of learning about the product on their own. 

Enhance Your Onboarding Flow with Interactive Product Guides

One best way to elevate this onboarding experience is by using a combination of product tours, in-app product guides, product checklists, and progress bars. 

Storylane can help you enhance your onboarding process by letting you record your product screens — and create pre-recorded product tours and interactive product guides. 

Want to see how Storylane can help you weave better in-app experiences? Book a demo.

Q1. What are onboarding flows?

Onboarding flow is the process of introducing the product and the user interface of your product to new users and customers. 

Q2. What is an example of user onboarding?

After signing up for the product, you are guided to a screen where the user needs to ask certain questions like:

  • What is the goal of using the product?
  • How do you plan to use the product?
  • How many team members do you have on your team?

By answering such questions, you move ahead in the onboarding process, and it helps curate a personalized and contextual onboarding experience for the user.

Q3. What is good onboarding flow?

A good onboarding flow educates the user on how to use the tool and makes them feel valued. It sends them a welcome email and provides a seamless learning curve so that the users know the exact steps they should take to freely explore the product and become proficient in using it. The successful onboarding flow formula includes: right content, right channel, and right timing.

Q4. What are the three pillars of onboarding?

The three pillars of a successful onboarding include:

  • Understanding the users and segmenting them
  • Personalizing the onboarding experience
  • Creating a guided customer journey

Q5. What are the six critical steps of onboarding?

The six steps of creating a user onboarding process includes:

  1. Understand your user’s goals
  2. Build multiple onboarding flows and segmenting users
  3. Offer value early
  4. Create intuitive user signup process
  5. Pick your onboarding elements and personalize
  6. Offer feedback and improve your process

Killer demos for every stage

Build demos and agents that turn curious buyers to closed won
Book a demo

Related Articles

Read All Articles
Guides
June 29, 2026
6 min read

Five ways B2B teams are using interactive demos that nobody talks about

What a conference booth in London, an EHR rollout for a differently-abled community, and a fintech triage system have in common — and what it tells us about where demo automation is actually going.
Ranga Kaliyur

What a conference booth in London, an EHR rollout for a differently-abled community, and a fintech triage system have in common — and what it tells us about where demo automation is actually going.

The standard demo automation playbook is predictable: marketing website tour, sales leave-behind, email nurture embed. That is what most companies start with.

But spend time in actual customer conversations and you see something different: teams using demos to solve problems the standard playbook never imagined.

This week, we reviewed a working session with an engineer at a large cloud computing company preparing for a technology summit in London. Her problem: she needed a product demo to play on a loop at her conference booth (no clicks, no one to navigate it, just a screen running in the background while conversations happened around it.)

Nobody markets demo automation as a conference booth tool. But that's exactly what she needed it for. And it wasn't the only unexpected use case this week.

1. Trade show and conference booth displays

The conference loop use case has specific requirements: autoplay enabled, 4-6 second transitions on title cards and pause slides, video clips set to 1.5-2x playback speed for longer recordings, and the entire thing downloaded onto the device. Conference WiFi is unreliable. You need the offline version ready before you walk in the door.

The structural formula that worked: technology stack slide (static) -> 4-second pause slide (blank) -> demo 1 with title card framing the problem ("Can I detect performance issues before they cause outages?") -> demo 2 -> repeat on loop. The problem-framing title cards are what make this work at a booth — a passerby reads a question they recognize and stops.

2. Staff onboarding for organizations with diverse accessibility requirements

A director of organizational performance at a nonprofit came to us mid-EHR transition. Her organization (200-plus staff, statewide) was moving to a new electronic health records platform and needed tutorials for everyone from clinicians to program administrators. Complicating factor: their staff includes a deaf and hard-of-hearing community.

Her requirements were specific: self-paced clicking rather than auto-advancing video, AI voiceover as an optional layer, and demos organized by function and embedded in SharePoint so staff could browse by department and role.

The training-center use case of interactive demos replacing annotated PDFs  is not new. The accessibility angle is. When a demo is self-paced, the viewer controls the speed versus video. That's a meaningful accommodation for populations that need more time, and it requires zero additional effort from the team building the content.

3. Multi-system integration demos

"We get asked all the time: what do these integrations actually look like?" said a co-founder at an early-stage health tech company. They had been answering that question in live demos, switching between systems in real-time and hoping nothing broke.

What they discovered: you can capture from multiple platforms in a single demo session. Finish recording in system one, click "add to existing demo," then capture from system two. The viewer moves between platforms seamlessly — without any live switching, without any risk of a broken environment. 

Live integration demos are high-risk, tedious (from a data management pov) and unrepeatable. Captured integration demos are neither. For a company whose primary sales objection is "show me exactly how the integration works," this is not a minor workflow change; it's a competitive differentiator.

4.Inside sales automation for long-tail accounts

An inside sales leader at a fintech company described a problem his team lives with daily: they manage accounts "where we're seeing very less revenue and more effort going from an account manager's point of view." His team's solution was a self-serve portal paired with interactive demos that replace human demos entirely for lower-priority accounts. Reps focus on the accounts with revenue potential; the demo handles the education and qualification for everyone else.

He had used this approach at a previous company and was replicating it here. The key insight: he was not evaluating demo automation as a way to improve existing demos; He was using it as a triage mechanism for a coverage problem. Interactive demos let you maintain a presence in accounts that don't justify a rep's time. That's a fundamentally different value proposition than "make your demos better," and it's one that VP of Sales audiences will understand immediately.

5. Localized demos for non-English-speaking markets

An inside sales team at a fintech company with a large India-based sales operation had one specific question: how many languages does the AI voiceover support? The answer, over 30, prompted an immediate workflow: build the demo once in English, then translate and duplicate into regional languages.

In markets where English-language demos create friction in the sales process, this is not a nice-to-have. It is a conversion rate issue. Prospects engage more deeply with content in their first language. The ability to generate a localized demo without re-recording or hiring a voice actor changes the economics of localization for inside sales teams that are already stretched thin.

Research
June 29, 2026
6 min read

Interactive demos vs. product videos: why revenue teams are switching over

Should you use interactive demos or product videos for sales? Compare creation time, maintenance, personalization, and analytics to decide.
Ranga Kaliyur

When sharing async product demos, sales teams have traditionally reached for a couple of options: quick and dirty screen recordings (think Loom, Vidyard, etc.) and high-end video productions (think Camtasia, Consensus, etc.). While there’s a time and place for both; AEs, SEs, and PMMs are increasingly adopting a third format — interactive demos — as a “better than both worlds” alternative. Here's why:

Interactive Demos vs Video: Feature Comparison
Compare Interactive demos
(Storylane)
Screen recordings
(Loom, Vidyard)
Video productions
(Camtasia, Consensus)
Time to create ✅ Fast, capture and creation often completed in minutes ✅ Fast but requires narration, timing, retakes, etc. ❌ Slow, can take weeks to script, shoot, and edit
Editing ✅ Self-serve, easy: replace screens, tweak text, reorder steps; no re-recording ❌ Limited scope: re-recording, trimming, stitching clips, fixing audio ❌ Technical dependency: needs expertise in pro editing software
Polish and branding ✅ Professional, consistent themes built-in; no editing software needed ❌ Low production value. Harder to maintain consistency; requires design/video tools ✅ Cinematic quality but requires video editing expertise
Publishing ✅ One-click publish; instantly updates everywhere ❌ Requires re-uploading and re-sharing new versions ❌ Requires re-uploading and re-sharing new versions
Maintenance & Updates ✅ Replace screens and content in minutes, auto-update instantly ❌ Requires re-recording entire sections/full-video ❌ Requires re-producing entire sections/full-video
Personalization ✅ Personalize at scale with dynamic tokens ❌ Hard to scale: Requires re-recording ❌ Impossible to scale: Requires re-production
Analytics ✅ Granular: Track views, interests, completion, and time-spent per step ❌ Limited to views, no actionable analytics or Opinions ❌ Limited to views, no actionable analytics or Opinions
Buyer experience ✅ Interactive, two-way experience ❌ Passive, one-way experience ❌ Passive, one-way experience
Ideal for… Across the board Ad-hoc touches, quick Q&A Top-of-funnel brand awareness campaigns

Why revenue teams are adopting interactive demos

Since our inception, we've noticed revenue teams of all sizes, from early-stage startups to Fortune 500 enterprises, switch over from videos to interactive demos. Here are the most common reasons we hear from customers.

Reason #1 - Speed without sacrificing quality

Screen recordings are quick and easy to produce but lack the polish and quality needed for high-value deals. On the other hand, producing polished video demos means days of planning, hours of environment prep, multiple recording attempts, and extensive editing. Interactive demos eliminate this friction entirely, especially now with AI, to instantly generate product-specific content (Guides, voiceovers, etc) from captured screens — no need for multiple takes. 

"Video is really strong at capturing people's attention and welcoming them into your story. But the thing that video can't do is provide a “click-through experience” allowing users to actually get their hands on the product — to feel it, to see it, to understand what the actual day in and day out of working with your tool is going to be like. Especially with its AI and automation, Storylane allowed us to build demos in such a quick amount of time."
- Michael DeMarco, PMM, Phenom

Reason #2 - Asset maintenance and scalability

Traditional videos are like baked cakes — once ingredients (product screens, click path, narrative) are combined into a video, it’s difficult to swap individual components. When your product UI changes six months from now, you face full reproduction from scratch.

Interactive demos keep these elements separate. Update a screen in minutes without touching the narrative. Adjust messaging without re-recording. Reorder workflows without starting over. This durability enables demos to stay current as your product evolves.

Further, creating persona-specific, industry-tailored, or localized video content means producing multiple versions of each asset — a multiplication problem that quickly becomes unmanageable. Storylane's AI editor recontextualizes entire demos for different personas or industries in seconds. Dynamic tokens automatically swap prospect information without creating separate versions. One base demo adapts to dozens of scenarios without manual overhead.

Reason #3 - Modern buying preferences 

Interactive demos respect buyer time by letting them jump to relevant sections, skip familiar concepts, and control their pace. Video forces a fixed timeline — even if viewers only care about one feature, they must scrub through the entire recording to find it. This level of control and self-serve flexibility reflects the preference of modern buyers, who'd rather click around a product tour for themselves than rely on a passive, one-way video.

"Nobody wants to watch a 5-minute video anymore. So my team sends a Storylane demo and the prospect sees the demo in 5 clicks."
- Jon Dolan, Sales Director, Cognism

The difference in analytics is equally striking. Video platforms show watch time and opens. Interactive demos reveal which features prospects explored, where they spent time, which stakeholders engaged, and where they dropped off. These step-level Opinions enable targeted follow-up conversations that video simply can't support.

Guides
June 29, 2026
6 min read

5 best practices for conference-ready interactive demos

Use interactive demos at events capture attention, boost booth engagement, and qualify leads in real time.
Ranga Kaliyur

Conference season is here! If your company is hosting an event or a booth, you've probably noticed that standing out in a crowded in-person environment is easier said than done.

Our customers are increasingly adopting Storylane to address this challenge; so we thought it might be helpful to share this quick checklist on how to attract, engage and convert conference attendees with interactive demos.

Key takeaways

  1. Set your in-booth demos on autoplay
  2. Download your demos for offline use
  3. Include forms to streamline lead gen
  4. Use QR codes to improve accessibility
  5. Service a broader audience with Demo Hub

Why use interactive demos at events, booths, and conferences?

There are several reasons why interactive demos work so well at in-person events.

  • For one, they stand out from the usual product decks, brochures, and videos.
  • More importantly, they let conference goers experience the product’s value on their own accord — with minimal sales intervention.
  • Also, as compared to live demos, interactive demos provide a safe and flexible product environment for smooth, guided discovery.

5-point checklist for interactive demos at events, booths, and conferences

1. Improve foot traffic with autoplay demos

Conference attendees don’t want another branded water bottle or pad of paper — they want to see innovative products like yours in action. Set your in-booth demos on autoplay to attract attention, improve foot traffic, and give attendees a relevant, hands-on product experience.

How it works: To set up Autoplay, toggle the Auto play demos option under the CONFIG menu of your demo settings.

2. Secure your product experience with offline demos

Remember that one time Steve Jobs ran into an unexpected internet issue during his keynote presentation for the iPhone? Well, if spotty Wi-Fi can affect the largest technology company in the world, there’s a good chance it can affect your product walkthroughs and presentations as well. 

Also, can we take a minute to talk about the Wi-Fi prices at these events and conferences? Especially given their unreliability, conference Wi-Fi can be absurdly expensive; as much as $2,000 per day! Yeesh!

This is where Storylane’s offline demos help. Offline demos support interactive demos even without an active internet connection. This is an effective way to avoid tedious ops works, awkward product crashes, and exorbitant Wi-Fi charges  — all in a single click.

How it works: Select “Download offline” to create a demo link. Once downloaded, you needn't worry about refreshing the page or losing progress during outages.

It’s also worth noting that Storylane doesn't require any additional software to work offline. These demos are built to run directly on your browser via a shareable URL — anytime, anywhere. 

3. Convert prospects on the spot with lead gen forms

Interactive demos can encourage attendees to convert on the spot during events and conferences. Prospects are usually happy to share their contact details in exchange for relevant product demos.

If your booth receives a lot of foot traffic, make sure to include a lead gen form in your demos. This is a good way to capture leads, even when your on-ground sales team is occupied with other prospects. Alternatively, offer to share a guided demo to high-intent prospects via email, LinkedIn, etc. to initiate  personalized nurturing efforts.

How it works: Head over to “Guide” on Storylane’s demo editor, add a step, select the screen of your choice, and pick “lead form” as your guide of choice. You can either use Storylane’s lead gen form or embed your own custom form. 

4. Empower better buyer enablement with QR codes

Furnish your booth, swag, presentations, and other marketing efforts with QR codes linked to interactive demos. This is a low-lift, non-invasive approach for prospects to take your product back home with them.

For one, this helps prospects review your product in their own time, rather than rushing through a demo at a busy booth. For another, this helps prospects share your demo with the rest of their team async.

How it works: Once you publish your demo, simply copy and enter the link into a QR code generator of your choice. Distribute this QR code across your marketing efforts to improve visibility and engagement.

5. Address multiple buyer personas and use-cases with Demo Hub

A single demo is rarely enough to convert multiple buyer personas. Accordingly, we recommend creating demo hubs as a centralized repository to address a range of audiences and use-cases simultaneously. Here’s a little more on how SentinelOne, a leading cyber security company, goes about this:

SentineOne created a demo-enabled “GeniusBar” kiosk at this year's RSA conference. This involved several iPads, displays, and on-ground sales reps showcasing Storylane demos to prospects while on the move. Since Storylane is device agnostic, prospects had a clean, true-to-life product experience.

How it works: Head over to "Demo Hub" in Storylane, and select "+ Create Hub" to get started. We typically recommend the Gallery layout for quick and snappy in-booth use-cases.

6. Bonus tips to make the most of your conference demos

Before signing off, here are a few short bonus tips to keep in mind when creating interactive demos for your next booths and conferences

  • Build a narrative: Like the interactive demos that go on your website, your conference demos should tell a relevant story about the pain-points and use-cases that your product solves for. Tailor this narrative based on the nature of the conference and its attendees.
  • Keep it short: Conferences are busy, jam packed affairs. Attendees are usually short on time, and even shorter on attention spans. Keep your demos concise and highlight only the most valuable, differentiated aspects of your product.
  • Clean up the data: Needless to say, it’s important that your interactive demos reflect your product in the best possible light. Use the HTML editor to blur sensitive information and update the data and copy.
  • Enable speakers: Using the real product during panel discussions or breakout sessions can be precarious, especially when you're presenting to a large, highly qualified audience. Storylane enables speakers with pre-curated demo flows, in-built presenter notes, and safe demo environments.

Make buying easy with Storylane