.svg)


In recent years, product walkthroughs have become a SaaS business's best friend 🤝
They improve customer onboarding experience and customer satisfaction, reduce resolution times, and increase user engagement.
Naturally, there's no reason for companies to ignore them.
But what they can't ignore is the complicated process and the pain it takes to create these interactive guided tours.
But hey, you have our back.
In this article, we'll teach you:
- How you can create an interactive guided tour
- 4 interactive product demo examples
- 5 best product walkthrough software
So, are you ready?
What is an Interactive Guide?
Picture this: you have *just* signed up for an invoicing software but you have no idea how to get started with the tool.
Once you sign up for the product, you see a small pop-up telling you to provide app guidance.
It showcases screen tutorials by emphasizing a specific icon or button and explaining its importance.
Once in a blue moon, you must have come across such a product that provides instructions to use the product.

Interactive guides, also called interactive product walkthroughs, handhold users to help them understand:
- How to use the product
- Improve the app onboarding process
- Increase product feature adoption rate
Once the user signs up for the product, they'll see a window pop-up or an interactive tooltip on the product's screen. These instructions that are displayed to the user are usually trigger-based.
Unlike product tours, the instructions provided through interactive guides come solely from the first action the user takes.
Walkthroughs vs Product Tours
Before interactive guides came into existence, SaaS businesses were largely dependent on product tours.
Product tours are automated video product tours that show the user the potential of your product. Once embedded on your SaaS website, visitors can see what your product looks like after signing up for your product, what are its strengths, and what features they can utilize.
But product tours came with a flaw. They were good when it came to educating the visitors about the product in a visual setting (which sometimes cannot be clear when going through the textual blocks of features on the website).
But absorbing all the different features of the product all at once became complicated for users. For sure—product tours engaged the visitors before they signed up for the product. But what after that? What will happen once the visitor signs up for the product and becomes the user?
But that doesn't work for each user. Not every user will understand textual product guides.
So, they had two options:
- Schedule a product demo with the sales team.
- Or, use the company's help guide such as user manuals, user knowledge base, and FAQs.
That's when an interactive guide for users comes into play. It provides clear instructions to the user on what their next step should be to navigate through the product.
Also Read: The Complete Guide to Demo Automation for Your SaaS in 2026
Step-by-Step Process to Create Interactive Guides
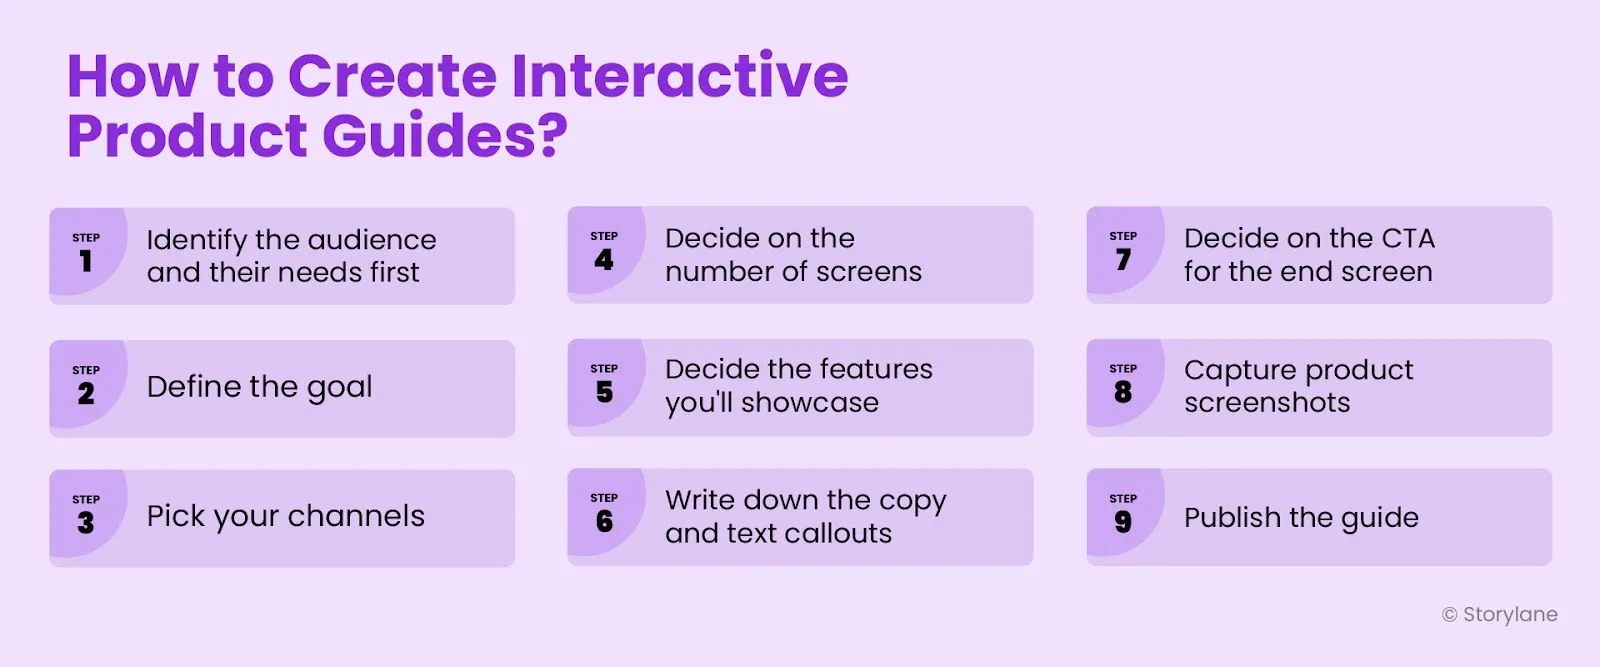
Creating an interactive guide will take literally minutes. All you have to do is follow a detailed process:
Step 1: Identify the Audience and their Needs
Define the target audience who’ll be using the interactive product guide.
This will give you clarity on how to present them the information, the language, and the industry jargon you can use to instruct them.
Step 2: Determine the goal of creating interactive walkthroughs
Do you want to improve the user onboarding experience? Or do you want faster product adoption? You’ll need to identify the specific goal before moving on to creating the interactive guide.
Step 3: Pick your channels
You can embed your interactive product guide on different channels such as blogs, websites, email campaigns or within the product itself.
Based on your goal, decide where you'll embed these guided tours.
Step 4: Decide on the number of steps you'll show
The number of steps in your interactive product tour should be less than 10. If you’re showcasing an entire product tour, then you could create multiple chapters for the different product offerings, and have flows within each chapter. This way, people can always navigate between chapters, or different personas can check out the features that they care about most without having to sit through an entire product tour.
For example, you can have multiple CTAs sprinkled throughout the tour, some can be the “Sign up” CTA, and some “Show Next Feature.”
Step 5: Plan the valuable features you want to showcase
Pick the product features and screens you want to highlight in front of your potential customers. Doing so, you'll know the exact features that will go in the product guide, which will further help you map out the flow of the tour.
Step 6: Write down the copy for each step
Since you have mapped out all the features and screens the prospective customer will see, write down the copy for all of them. Doing this will make your process more efficient and you'll be able to quickly upload the copy in interactive product guide software.
When writing the copy, make sure to highlight the benefit of the specific feature.

Step 7: Decide on the end screen and CTAs
Do you want a generic end screen with CTAs or a converting end screen with CTAs? Without the right CTAs for your end screen, you lag at achieving your final goal with the guided product tour.
When adding it, first decide how many you want to display. Remember, it should not be more than two CTAs for a 10-step guide.
Two CTAs work well when you're breaking your tour into different stages, more if you’re breaking it into multiple smaller flows.
In this case, the first CTA could be a continuation to the next stage, and the second CTA could be the final CTA combined with your conversion goal.
Step 8: Capture product screenshots
Now, capture your product screens using the interactive product guide software, or manually upload them on the platform.
Once done, edit your product screens by adding interactive elements such as adding annotations, hyperlinks, buttons, CTAs, and more to make the product screens more instructional and engaging.
Step 9: Publish the guide
Finally, publish the interactive guide and embed it on your website for visitors.
💡Pro Tip: Create your next interactive product demo using Storylane. All you have to do is follow this 4-step process to create a guided product tour with Storylane.
3 Great Interactive Guide Examples
Below we have decoded a few interactive product guides that provide automatic guidance to users who interact with these guided demos.
Use these examples as inspiration to create your interactive walkthrough.
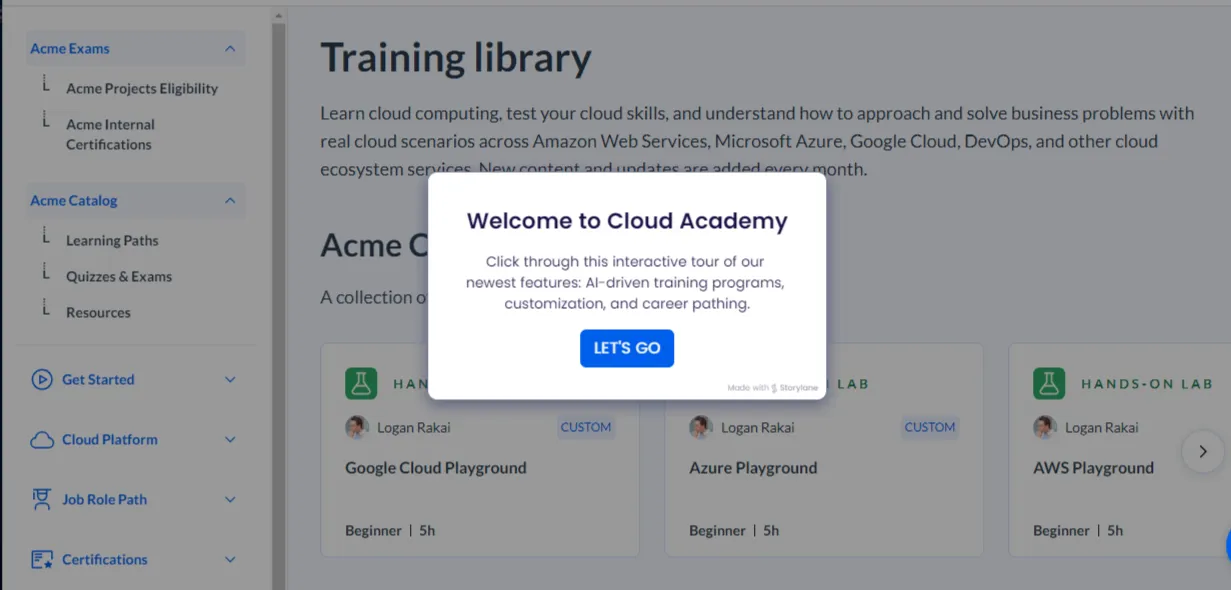
Example 1: Cloud Academy
Cloud Academy features the 'Tour the product' on its website. Because the CTA is on the first fold, it draws the visitor's attention quickly encouraging them to view the interactive product guide.

What works: When you click on the CTA, you’re directed to Cloud Academy’s welcome screen which guides you through the product.
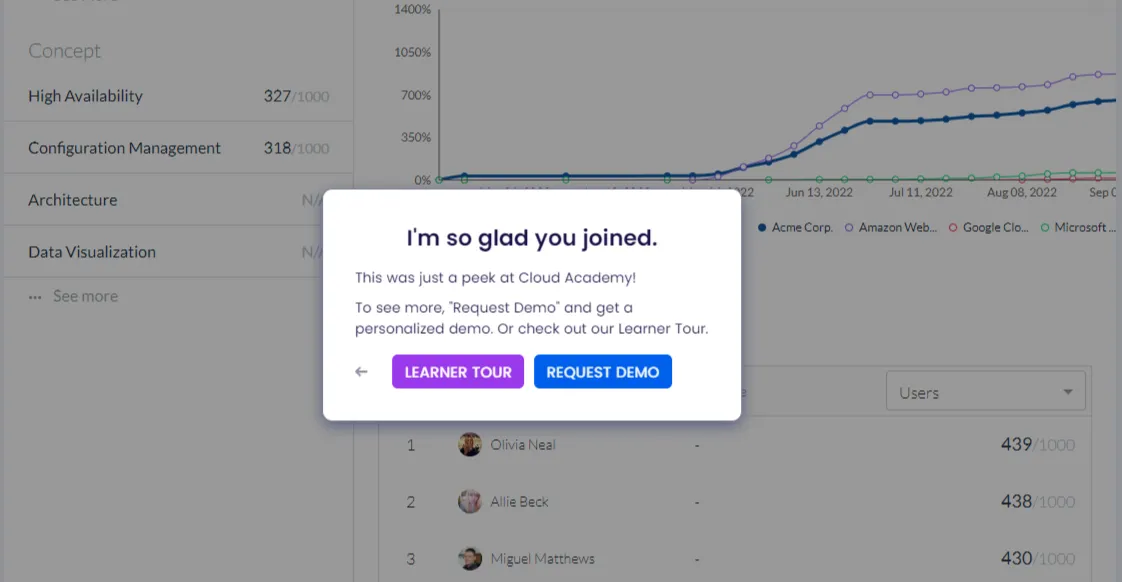
When you reach the end of your guided tour, you’ll see a pop-up with two options: 'Learner Tour’ and ‘Request Demo’.
- Request a demo: You’ll be directed to fill out the lead gen form, after which, the sales team will reach out to you for a comprehensive sales demo.
- Learner tour: You’ll be directed to the Dashboard’s welcome screen, which will further guide you on how to use the product once the user signs up for the product.
Why do we like this interactive demo?
- On the end screen, one CTA features a request for a live demo, and the other one features another guided tour. Either way, Cloud Academy is keeping the prospects engaged.
Guided tour: Cloud Academy’s Learner Tour
Created with: Storylane
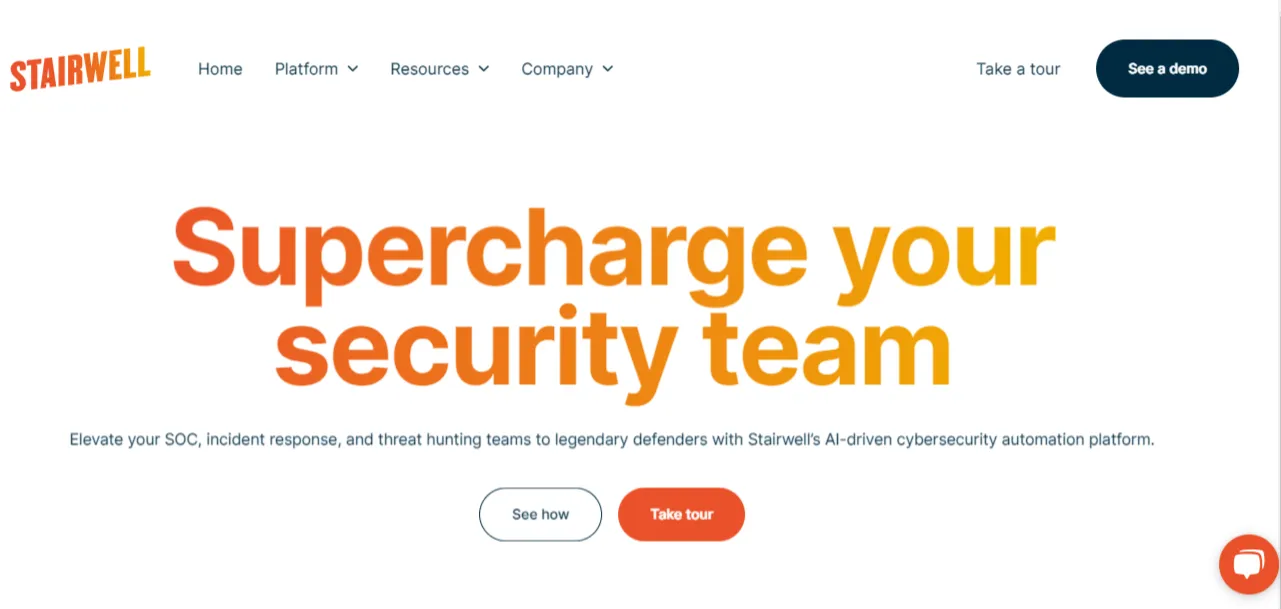
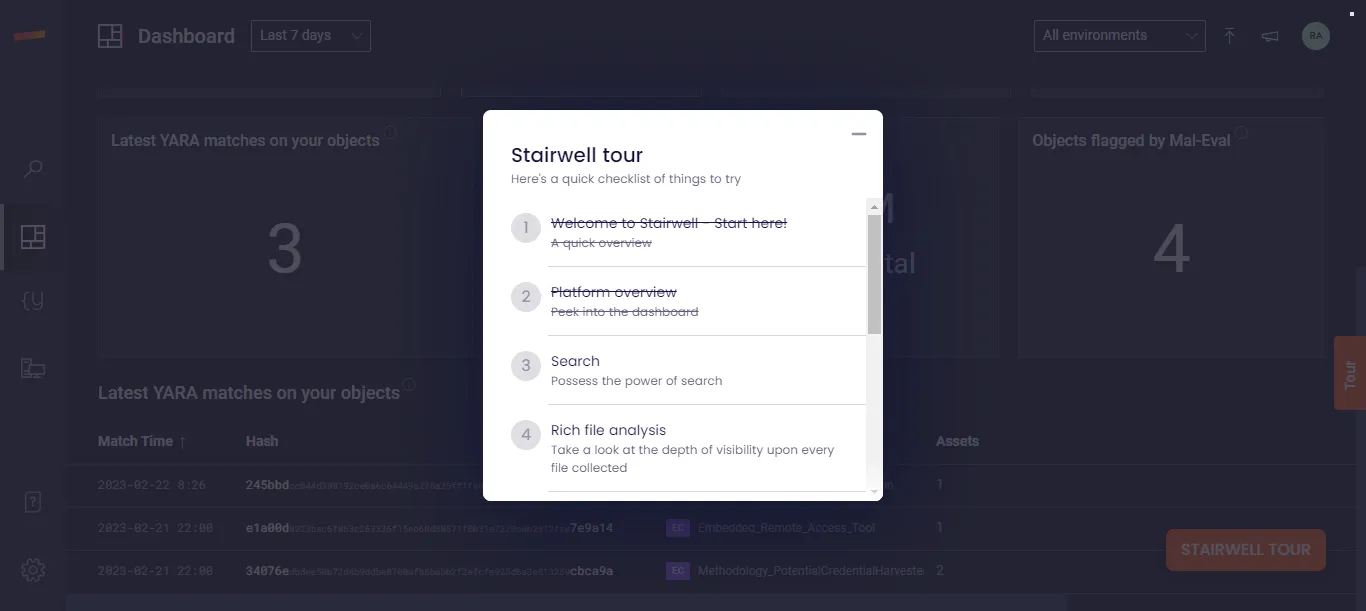
Example 2: Stairwell
Stairwell features two CTAs in the first fold of their website—'See how' and 'Take tour'.
When the visitor clicks on the ‘Take tour’ button, they are directed to Stairwell’s welcome screen.
What works: Here instead of a generic guided tour, the prospect will see the tour checklist.
Here's the sequence in which they created the checklist:
- Welcome screen
- Product overview
- Product features
- Final action
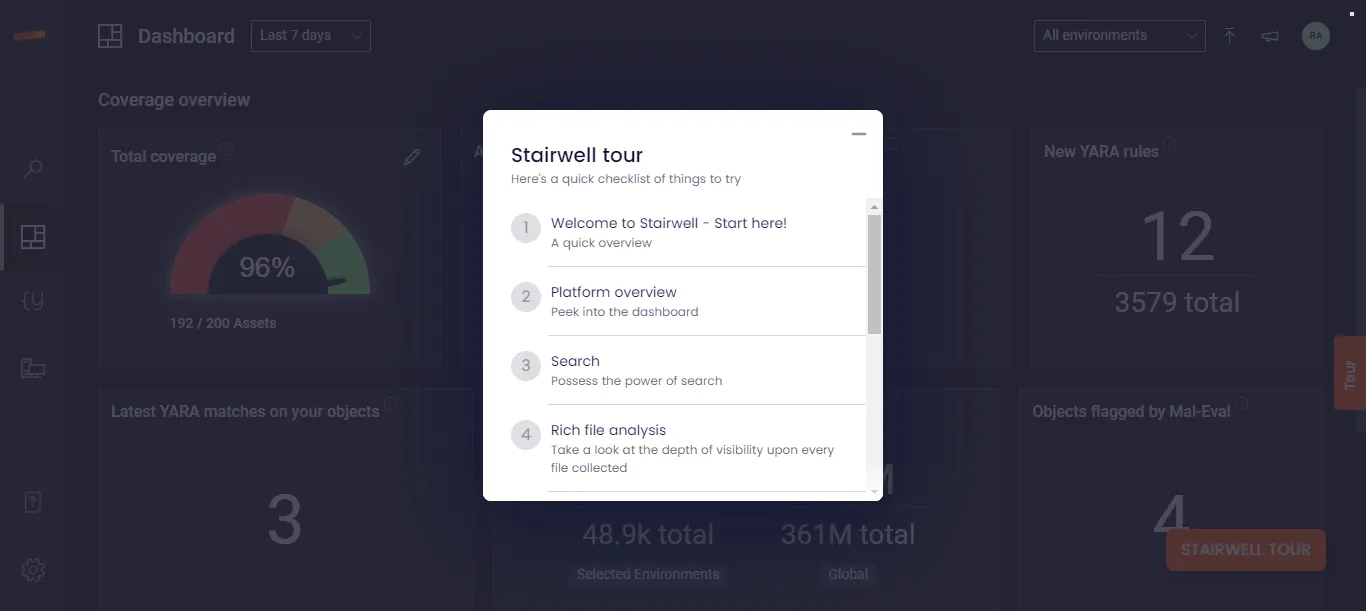
Based on the checklist, the guided demo is broken down into different stages. Once the user completes viewing Stage 1, this is how the tour checklist will appear.
Once you complete the first phase of the tour, you’ll see a pop-up with two buttons—’Contact Team’ and ‘New Feature’.
On clicking the ‘Contact Team’ button, the prospect will be directed to fill out the lead gen form.
And if the prospect selects the ‘Next feature’ option, the prospect will see the guided tour checklist showcasing the listed features. The prospect can then click on the relevant feature they want to see and the guided tour will continue.
Why do we like this interactive guide?
- It uses a checklist in its interactive guide to tell the prospects what they can expect by engaging with the guided tour.
- Instead of directly starting the tour, it educates the prospects about its USPs and how it helps its users. This makes it convenient for the prospects to have a better understanding of the product.
Guided tour: Stairwell’s Product Tour
Created with: Storylane
Example 3: Gorgias
Gorgias uses both live product demos and interactive guided tours to engage the visitors on their website.
However, unlike the other examples we saw above, it doesn't feature the product guide in the first fold of its website.
Instead, they have created a page called 'Product tour' in the header.
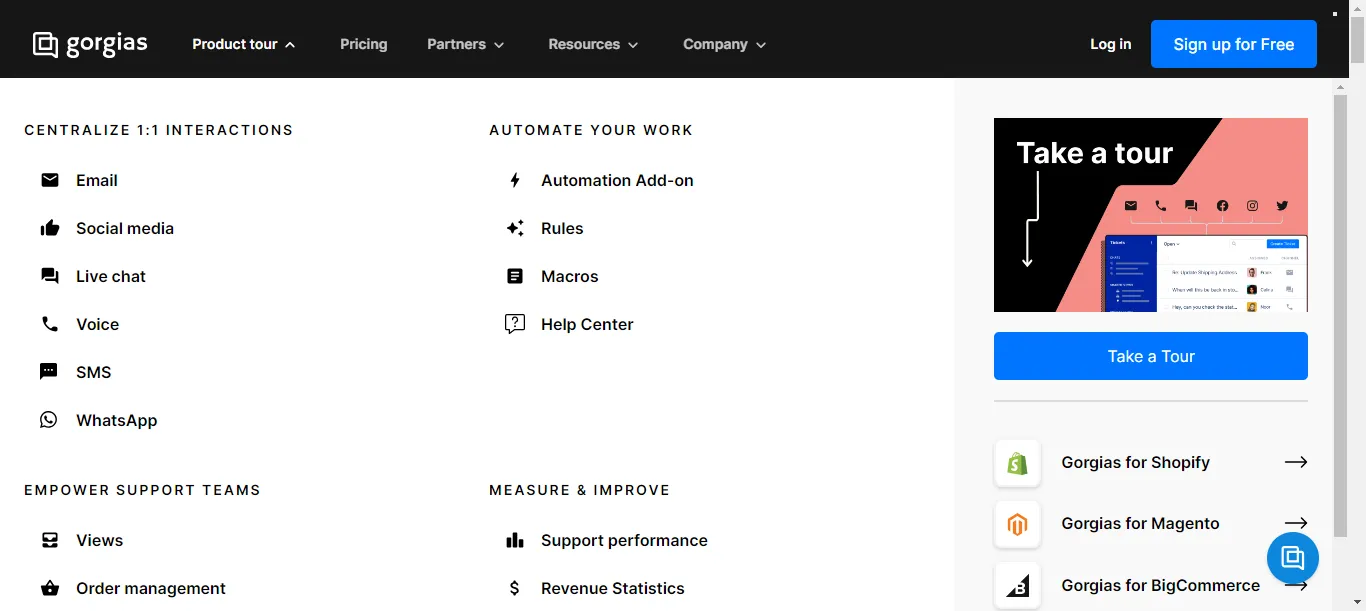
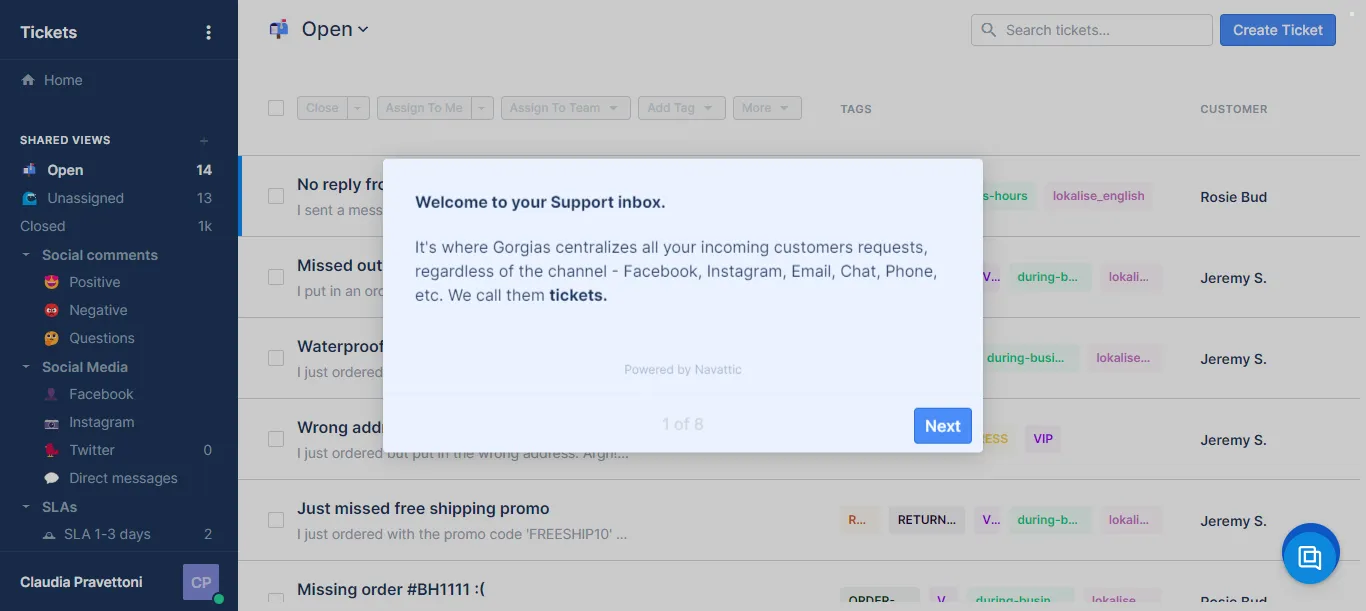
What works: When the prospect taps the 'Take a tour' button, they are directed to a new screen with a pop-up asking for the prospect's email address.
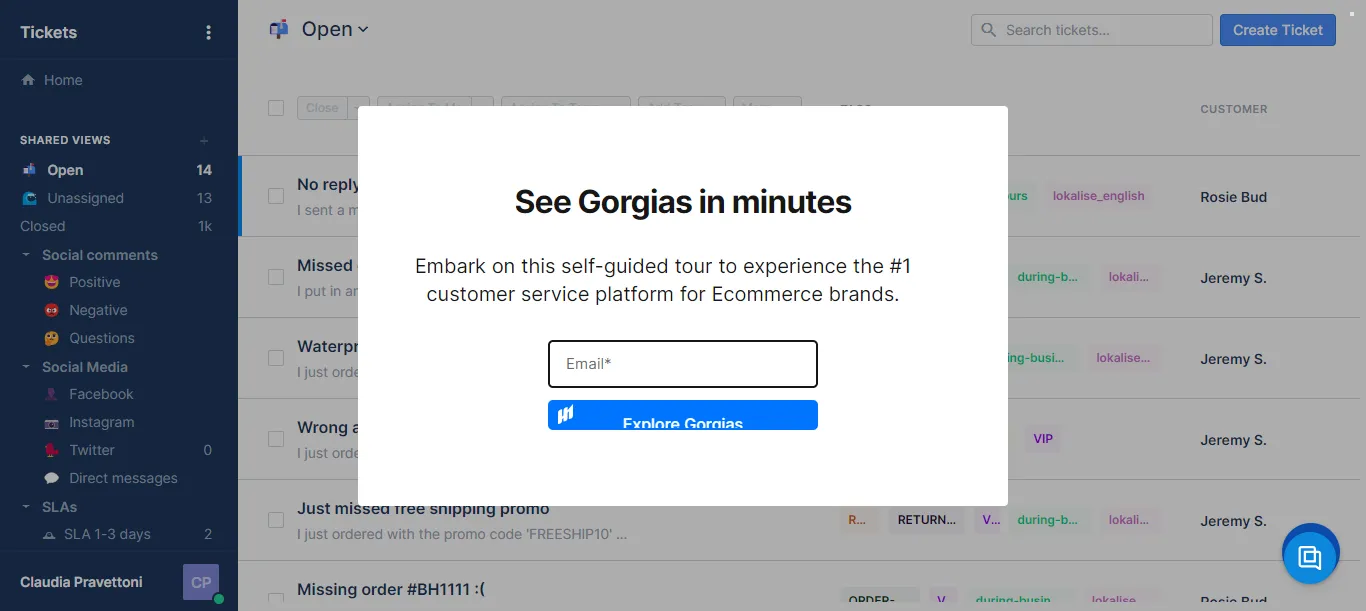
Once the prospect fills out their email address, they'll see the welcome screen and the guided tour will begin.
On the end screen, unlike other interactive product demos, Gorgias has added two elements:
- Case studies to showcase their results
- CTA to sign up for the product

Why do we like this interactive product demo?
- Instead of a generic end screen, they add links to customer stories, which hammers the nail to convert the users into customers in case the potential customer has concerns even after viewing the guided tour.
Guided tour: Gorgias Product Tour
5 Best Interactive Guide Software
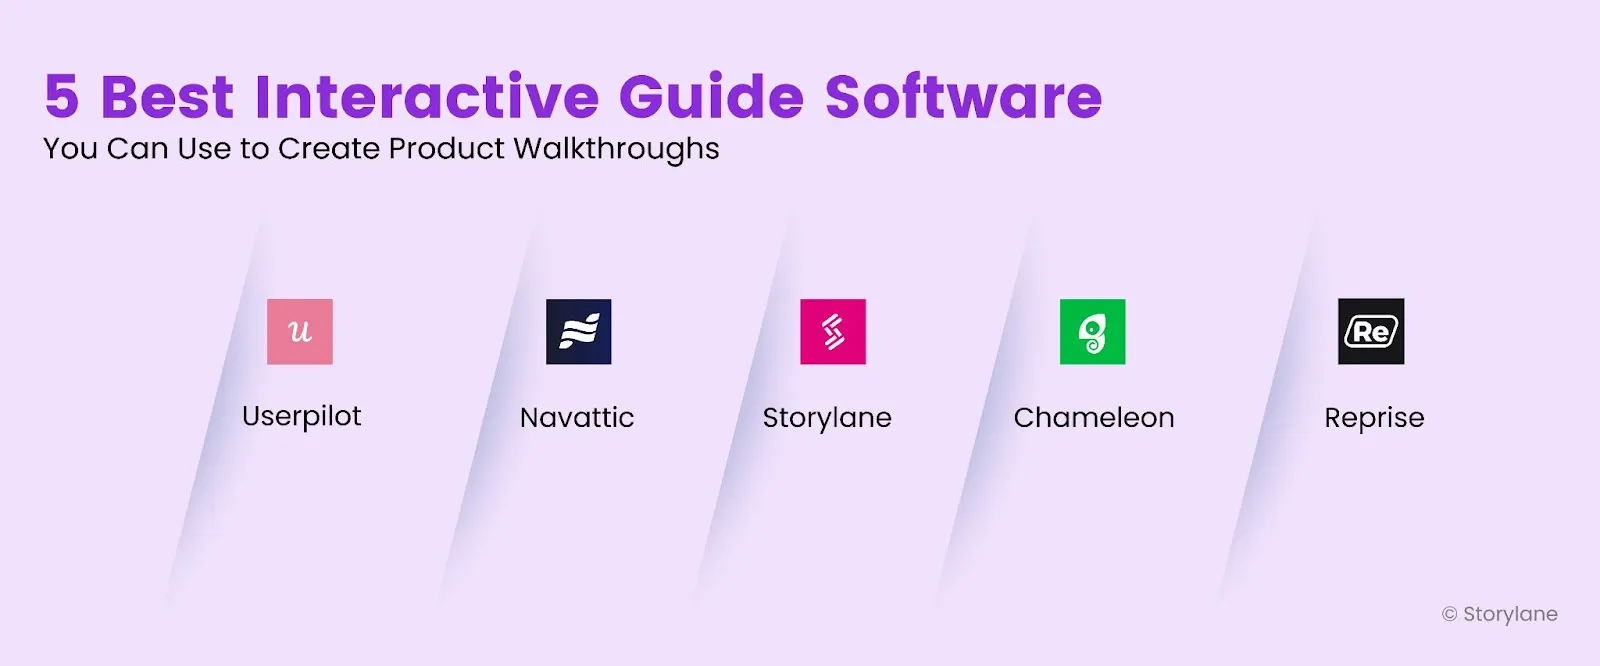
Below we have shared a list of product walkthrough software you can use to create interactive guided tours for your SaaS business and include in your software stack.
Some of these software applications solely offer product tours and guided product demos, others offer in-app guidance, and there are also demo creation platforms that allow you to create all kinds of interactive demos. Let's discover them:
1. Storylane
Storylane is a no-code platform that enables you to build interactive product demos in just 10 minutes, using screenshot and HTML captures. Along with this, the platform allows you to track the demo analytics like leads, engagement, CTA clicked, time spent on the demo, completion, etc. This demo platform allows you to create guides or demos for all the stages of the buyer journey.
See how 200+ B2B buyers are taking advantage of interactive demos.
It offers AI assistance such as voiceovers and translating the demos to different languages—which is a great feature for sales and marketing teams who are targeting multi-lingual prospects. Also, according to Business Solution.org, Storylane is the best software to use for interactive product demos.
Pros:
- Competitive pricing
- Incredible customer support
- Allows both HTML and screenshot captures
- Supports embedding custom lead gen forms from any marketing automation tool to collect contact information of the leads
Cons:
- HTML editing is unresponsive sometimes
- Lacks features for bulk editing of demos
Pricing: $40 per month
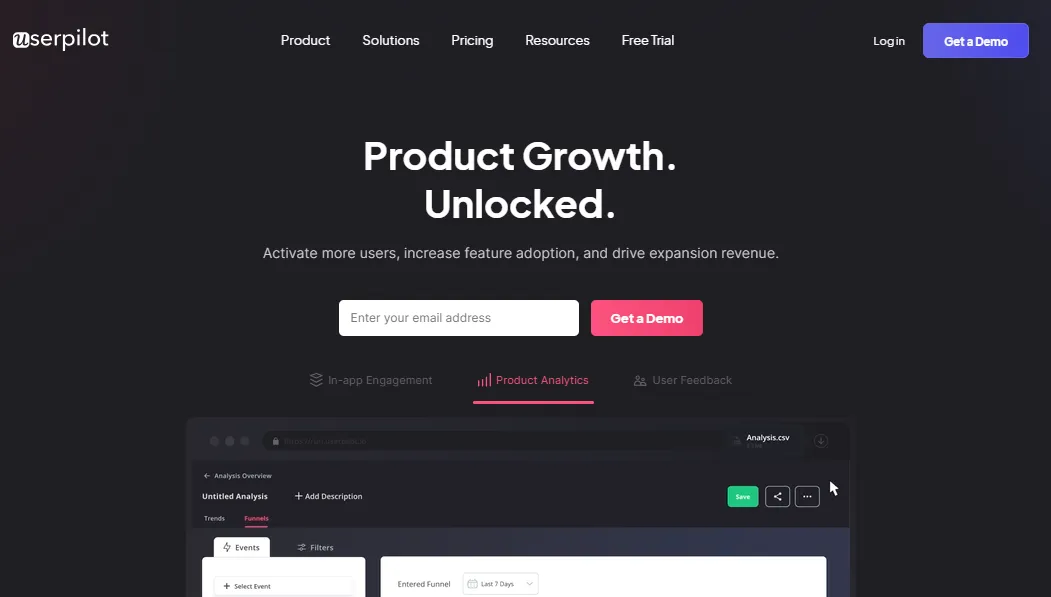
2. Userpilot
Userpilot is a user onboarding tool that helps product managers, customer success managers, and their teams increase user adoption by providing in-app user engagement, user behavior analysis, and capturing app customer feedback.
Pros:
- Creating product flows is simple
- Allows creating custom in-app messages without coding
- Comes with language targeting functionality that enables reaching a wider net of geographical audiences (speaking different languages)
Cons:
- Some product creation features are buggy
- No option to schedule the flows
Pricing: $249 per month
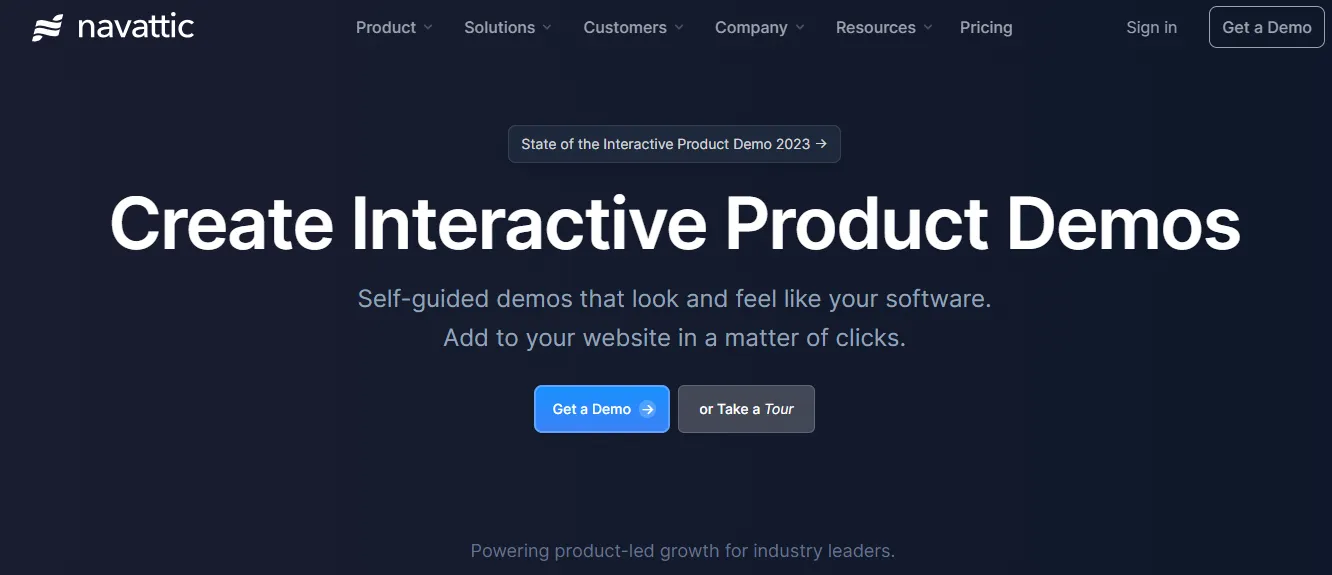
3. Navattic
Navattic helps you create interactive product guides by enabling capturing product screens (HTML captures), editing the demo, and sharing it with potential buyers.
Pros:
- Incredible customer support
- Frequent product enhancements
- The magic editor lets you edit each element on your screen captures
Cons:
- Limited analytics
- Allows HTML captures
- HTML editor experiences hiccups sometimes
Pricing: $500 per month
4. Chameleon
Chameleon is a no-code, cloud-based software solution for product success teams in SaaS that enables feature adoption, and feedback collection. With this tool, product managers can create release note announcements, tooltips, launchers, and product tours.
Pros:
- Simple workflow
- Provides deep user segmentation for product tours
- Comes with interactive elements such as launchers, A/B testing, rate limiting and alerts to improve the demo experience
Cons:
- Limited features to create customized surveys
- Limited integrations
Pricing: $279 per month
5. Reprise
Reprise is an enterprise-focused demo software for sales and marketing leaders that creates live demos, guided demos and product tours for its audience.
Pros:
- Top-notch customer service department
- Reprise provides advanced elements like default linking of all pages, animations, anonymizing the data, tailoring the data for a specific person and so on.
Cons:
- Clunky software, difficult to use
- Doesn’t fully support mobile tour experiences
- Provides the ability to modify the existing demo pages via the visual editor, HTML and JS
- Steep learning curve
Pricing: Not provided
Also Read: Compare Storylane to Walnut, Reprise, Demostack, Navattic and Tourial
Start creating interactive guides!
Trust us, it's a matter of minutes to create an interactive product guide. All you need to know are the different product options you need to check out to create the product guides you prefer to create.
And voila, you're done!
Interactive product guides - Frequently asked questions
Q. How do I create an interactive help guide?
Interactive help guides are the textual format that guides the user about how to use the product. These guides include textual information combined with graphics such as videos, GIFs, and images to make them easy to read and understandable. Here’s how you can create an interactive help guide:
- Decide what to document. If you find it confusing, look at the database of questions prospective customers have asked about the product from customer success and sales teams.
- Create readable content. Mention every single detail about your product. Make sure to answer the 'what', 'why', and 'how' while writing the content.
- Use bullet points, white spaces, headers and formatting styles like bold, italics and underline to format your content well
- Include images, videos, GIFs and tables to make your help guide more interactive. You can also embed guided product tours within your help guides to provide better guidance to the users - Use knowledge base software solutions. Tools like Zendesk and Helpscout are great to host your help guide
- Organize the information. Decide the sequence in which you’ll put the information and organize this information in the form of chapters. Here’s what an ideal sequence looks like:- Get started with the product
- Product features
Q. How can I make my user guide more interactive?
While adding elements like images, videos, GIFs, tables and product walkthroughs can make your online user guide more interactive, you can also use the following options:
- Build personalized in-app experience with advanced user segmentation to provide targeted and personalized customer experience
- Use in-app user onboarding checklists to tell the user about their progress
- Build a resource center to consistently educate the users about your product
Q. Do I need a developer to create interactive product guides?
No. No-code tools like Storylane let you build guides in under 10 minutes. Traditional in-house builds require 3+ months of engineering time. Some platforms like Userpilot need basic CSS knowledge.
Q. Can interactive guides help with feature adoption and upselling?
Yes. Trigger contextual walkthroughs when free users hit paywalls or when specific usage patterns suggest they need premium features. This increases upgrade rates without requiring sales calls.
Q. How do I choose between gated vs ungated interactive product guides?
Gated guides capture lead information first, giving you higher-intent prospects but fewer viewers. Ungated guides maximize reach. Use ungated for top-funnel awareness, gated for qualified demo requests.